Plan Your Route

Whether you’re commuting to work or school, getting some exercise, or riding to get your groceries, planning your route can be a difficult — but necessary — step. You don’t want to get to your destination and realize you have to cross a six-lane highway in order to get there, but you also don’t want to ride down a cul-de-sac and not be able to get out. Below are our tips on how to plan your perfect route.

Mapping Out a Safe Route

Use Google Maps

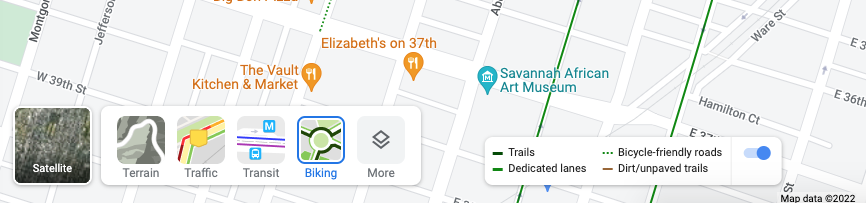
Google Maps has come a long way in helping plan bike routes! Visit Google Maps, click Layers at the bottom of your screen, and then click Biking to show trails, dedicated lanes, bicycle-friendly roads and dirt or unpaved trails.

You can input your starting point and destination and select biking, which will suggest routes that follow bike infrastructure or bike-friendly streets, if available. You can even select street view in order to see a photo of the street, which can help you in quickly identifying if that’s a route you’d like to take. Pro Tip: Under Layers click Traffic, which can help you identify if streets are closed or if traffic is moving slowly in certain areas. Also, the wider the street the more cars are likely to be on it — and moving quickly!

Use Strava, Map My Ride or Ride with GPS

The great thing about biking in Savannah is that we have a lot of people out biking with you! There’s a pretty good chance that someone has a route similar to the one you’re looking to create, which means that websites like Strava, Map My Ride or Ride with GPS can help you find a route that someone has already ridden. They can also have heat maps, which can show you where people are riding.

Image © Bikabout

Tips for Planning Your Route

Maybe you can find a route digitally, but you’re concerned about riding it in person. You don’t have to dive all in right away!

  • Talk with other bike riders: Check out local biking groups on social media or in person and ask for some tips! Check out Bike Walk Savannah’s events for some more details on our rides.
  • Scout the route: If your route is on streets and not on bike paths, try it out in your car first. While you won’t be able to get exactly the same feel for the road, you can easily see if there are areas that are blocked off, high volumes of other cars, or might not have a safe crossing for you to use.
  • Experiment with your route: If you know the area well enough, take some time to experiment with different possible routes. Make sure to leave around the same time you would be biking to or from your destination, but give yourself some extra time (like on your day off). This can help you find additional streets that might be a little more comfortable for you.
  • Be familiar with your map: What happens if the street you usually take is closed due to construction or a crash? Do you know what other streets you can take? We recommend knowing a few different alternate routes, as well as knowing what sections you can’t swap out. This can also be helpful for different times of day — maybe you go to work taking one route, but return home on another.
  • Don’t be afraid to go multi-modal: Maybe you can’t ride directly from your house, but you can pick up some safe
  • streets a mile or two away. Check out Chatham Area Transit and see if there’s a bus you can take for part of your trip!

Need some more help? Request some bike route assistance from the BWS team or check out our routes page.

Visit joesteffen.com/bicycle-law for more information.


This blog post is produced thanks to support from the Governor’s Office of Highway Safety.

How to Lock Your Bike

Nothing ruins your ride faster than having your bike stolen! Here are some steps you can take to seriously reduce the likelihood of that happening.

  • Use a U-lockCable locks can be cut more easily than you might think. Cheaper and older U-locks can often be broken without any tools. Sourcing your U-lock from a local bike shop is a good way to make sure you’re buying a quality product.
  • Don’t make it easy to steal! Bike thieves love low hanging fruit, and nothing deters them like the presence of a quality lock. Many thefts are crimes of opportunity, so make your bike the hardest one on the rack to steal.
  • Lock the frame first. Try to secure the wheels and seat, too. Your bike frame happens to be the most expensive part; make sure you lock it to something secure. Use a secondary cable to lock the wheels and seat. In many cases a U-lock can be used to lock both the frame and rear wheel. Accessories (lights, pumps, etc) are commonly stolen items. Take them with you.
  • Your lock is only as good as what it is locked to. Make sure whatever you locked up to isn’t going anywhere. Be mindful that trees and wood can be cut or kicked through.
  • Your garage, shed, or storage room isn’t as safe as you think. Even if you have parked your bike in a “secure location” be sure to lock it to something. Bikes are commonly stolen from garages or shared basements.
  • Document it! Take pictures of your bike, record the serial number, and where possible list your bike on your insurance.
  • After you’ve done that, make sure to register your bike with Savannah Police Department and Bike Index. The Bike Index makes stolen bikes harder to sell and easier to recover by making sure important information about your bike is there when you need it the most. The process is simple, secure, and free.

View our map of bike racks in Savannah here:

Visit joesteffen.com/bicycle-law for more information.


This blog post is produced thanks to support from the Governor’s Office of Highway Safety.

How to Fix a Flat Tire on a Bicycle

Knowing how to change a flat tire is a useful skill, especially if you’re going on longer rides or don’t have a local bike shop nearby. It can be daunting at first, but it’s easier than you think! All it takes is some practice.

Our friends at Park Tools have a great basic overview of how to repair a flat tire on a bike. Read on for step by step instructions!

What you need:

  • Tire levers
  • Air pump
  • Wrench (for non-quick-release type wheels)
  • Replacement tube and/or tire
  • A repair stand can be helpful, but not necessary

How to:

  1. Remove your wheel
    1. Rear Wheel: Shift derailleur to the outermost gear and innermost front chain ring to give you chain slack.
    2. Disengage any rim brakes.
    3. Disengage the wheel from your frame.
      1. Quick Release: pull outward on end of quick-release skewer lever. If necessary, loosen quick-release adjusting nut to clear any tabs at end of fork.
      2. Thru Axle: some function similarly to quick-release axle – pull lever outward to disengage and turn to loosen. Some thru axles are equipped with a special fitting that must be engaged to loosen the axle. Still others are simple levers that turn to loosen or tighten – no engagement or disengagement is necessary.
      3. Solid Axle: For wheels with axle nuts, loosen both nuts outside of dropouts.
    4. On a front wheel, guide the wheel down and out of the fork. For rear wheels, pull back on the rear derailleur to allow the cogs to clear the chain and lower the wheel.
  2. Deflate your tube completely
  3. Remove your tire
    1. Push one side of the tire inwards, close to the rim of your wheel, to help loosen the tire bead from the rim. Do this around the entire wheel.
    2. Push one tire lever under the bead of the tire, between the tire and the rim of the wheel. It can be helpful to do this near the valve stem.
    3. Insert the second tire lever under the bead of the tire a few inches away from the first one, between the tire and rim of the wheel.
    4. Pull both levers toward spokes to lift the bead off the rim. Move one lever a few inches along the rim and lift the next section, proceeding around the wheel.
    5. Starting opposite the valve, pull the tube from the tire. Lift the valve from the valve hole to full remove the tube.
    6. Remove the tire completely to fully inspect the tire for any cuts or holes.
      1. You may be able to use a tube or tire patch kit to fix any small holes or cuts, but replacing the tube is always the safest and most reliable option.
  4. Inspect the wheel rim for any sharp edges or protruding spokes. No point in replacing a tube if your wheel rim is damaged!
  5. Install your tube
    1. Inflate tube enough to hold its shape
    2. Install tube inside tire, with valve adjacent to air pressure recommendations written on the sidewall of the tire.
  6. Lower tire and valve into rim valve hole. Note any directional arrows on your tire and orient the tire appropriately.
    1. Make sure to keep your valve pointing straight towards the hub of your wheel!
  7. Install one side of the tire bead at a time. You can use your tire lever carefully and strategically to help work the tire in, but be careful and avoid pinching your tube.
  8. Once both sides of your tire are installed properly, inflate the tube to low pressure and inspect each side for any bulging, inner tube sticking out, or inconsistencies. You may need to deflate the tube and reinstall the tube and tire.
  9. Once everything looks ok, inflate your tube to full pressure.
  10. Reinstall your wheel
    1. Work backwards from how you removed your wheel!
    2. Make sure any quick-release levers are tightened and your wheel is secure.
    3. Re-engage brakes.
    4. Make sure your wheel is centered in the frame or fork.

And now you’ve changed your tube and tire!

Want some practice? Volunteer with our New Standard Cycles Crew on Thursdays from 6:30-8:30 p.m. and Sundays from 2-4 p.m. and help fix up bikes while learning some new skills.

Visit joesteffen.com/bicycle-law for more information.


This blog post is produced thanks to support from the Governor’s Office of Highway Safety.

All about helmets!

Fitting a Helmet

A bike helmet that fits you properly will feel better — and do its job in case of a crash. But how do you select the right size bike helmet?

To find your bike helmet size, measure the circumference of your head using a cloth tape measure or a piece of string and a ruler. Be sure to measure horizontally across your brow and over your ears. Most helmets come with a size guide (or you can find one online), so make sure to measure your head before you go to save some time!

You also want to look for a helmet that matches your style of riding. Road bike helmets are designed to be lightweight, well ventilated and aerodynamic. Mountain bike helmets often offer extended rear head coverage to account for collisions with objects on off-road trails. If you’re an everyday commuter or recreational rider, look for helmets that are well-ventilated with an adjustable tightening wheel and visor to help shield some sun.

Get the right fit

Put your helmet level on your head (not tilted back) with the front edge two fingers above your eyebrows. This helps protect your forehead.

If your helmet has one, tighten the rear adjustment dial until the helmet no longer wobbles or slips. It’s important to have your helmet properly positioned before tightening it.

Next buckle the chin strap. The straps should join right under your ear to form a “V”. Adjust the straps around both ears so they are not twisted and it’s comfortable. You can use your pointer and middle fingers to form a “V” around your ears to figure out the best position — snug but not too tight. Put those same two fingers together and put them between the strap and your chin. There should be enough room for two fingers. Any tighter and you may have trouble breathing, talking or drinking water while riding, any looser and your helmet can easily be knocked to the side.

A helmet that fits correctly should be comfortable and will not move forward (obscuring your vision) or backward (exposing your forehead.) A comfortable helmet is a helmet that you’ll actually wear!

Visit joesteffen.com/bicycle-law for more information.


This blog post is produced thanks to support from the Governor’s Office of Highway Safety.

Do you know your ABCs?

We’ve all had this happen — you get dressed, you put your helmet on, make sure your lights are charged, and as soon as you roll your bike out the door you notice the tires are flat. Or even worse, you get halfway to your destination and notice that you’re losing air — or your brakes are squeaking.

Familiarizing yourself with basic bike maintenance will help you whether you’re commuting to work every day or riding recreationally, and will help keep you safe. And the first part is as simple as knowing your ABCs! Performing the ABC Quick Check before heading out on your ride ensures your bike is safe to ride, and helps you notice when anything might go wrong.

A is for Air

Make sure your tires are inflated to the pressure listed on the side of the tire

When your tires are correctly inflated, use your thumb to gently push on the outside edge and feel the pressure. This will help you quickly gauge if you need air in the future!

Check for damage on your tire and replace if it is too worn

B is for Brakes

Inspect your brake pads for wear, replace if there is less than 1/4″ of pad left

Check pad adjustment and make sure they don’t rub the tire

Look to see that you can fit your thumb between the brake lever and handlebar when the brakes are squeezed all the way — this means they’re properly adjusted

C is for Cranks and Chain

Pull on your cranks/pedals away from the bike — if they are loose, tighten the bolt.

Check that your chain is free of rust, gunk and any debris

Quick is for Quick Releases

Make sure all your quick release levers are closed (check your wheels and seat!)

They should all be pointing down and towards the back of your bike, so they don’t get caught on anything.

And then CHECK it all over!

Take a quick roll around to make sure everything is working properly, and if you’re carrying any cargo that you’re well balanced.


More of a visual learner? Check out this video from our friends at the League of American Bicyclists:

Learn more tips on our Resources Page.

Visit joesteffen.com/bicycle-law for more information.


This blog post is produced thanks to support from the Governor’s Office of Highway Safety.

Take the SR 307 Corridor Community Study!

The Chatham County-Savannah Metropolitan Planning Commission, on behalf of the CORE MPO, is undertaking the SR 307 Corridor Study to identify short-term and long-term improvements needed along the corridor to maintain and enhance traffic safety and operations along SR 307/Dean Forest Road.

The study will evaluate the existing and future capacity, operation, and safety conditions of the corridor from its southern terminus at SR 25/US 17/Ogeechee Road northwards to its terminus at SR 25/Main Street near a major Georgia Ports Authority truck gate. This study will:

  • Utilize data to evaluate the operation and safety of the corridor with strong consideration given to access management improvements that will improve the operation and safety;
  • Consider freight, commuter, local traffic and pedestrian/bicyclist travelers, and;
  • Account for current and future land use patterns and anticipated continued growth.

The goal of the study will be to identify and prioritize short and long-term improvements in a prioritized list of recommendations to facilitate the planning and programming of projects through the Metropolitan Transportation Process (MTP).

Meaningful engagement of the community is critical to ensure that residents, businesses, community leaders, and other stakeholders have an opportunity to actively participate in the process and support the final project recommendations.

A survey is available for those who live near, work on or frequently take SR 307. Click here to take it!

Click here to view the presentation from the Community Meeting on Nov. 8, 2021.

Pedestrian Safety Tips

Pedestrian safety can be a two way street. Interested in learning how to be a bike and pedestrian friendly driver? Sign up for our next webinar!

Read on for some Pedestrian Safety Tips from Bike Walk Savannah.

  1. Walk on the Sidewalk
    If there are no sidewalks, walk as close to the left side of the street as safe, facing traffic.
  2. Cross at the Corner
    Cross at intersections or street corners for the most visibility, unless directed to a mid-block crossing by signage or markings. When possible, cross between white painted crosswalk lines.
  3. Obey Traffic Signals
    Before stepping out into the street, be sure to look at all traffic signals — don’t rush!
  4. Look Left, Right, Left
    Make sure traffic has come to a complete stop, and that you can fully see the street and any drivers. Don’t forget to look the wrong way down one-way streets, especially downtown!
  5. Watch for Turning Traffic
    Try to make eye contact with any drivers, especially those who may be turning. Watch for right turns on red!
  6. Be Careful around Driveways
    Check for signs that someone may be driving backwards, including brake lights or reverse lights. Drivers often move without checking as much as they should when they are in their own driveway.
  7. Aim to be Seen
    Avoid wearing dark-colored clothing at night or in inclement weather, or use reflective materials and carry a light. This may not always be possible due to required uniforms for work, so if you do have to wear darker clothes try to stick to well-lit routes.

BWS October Newsletter

Friends,

We can’t believe it’s almost October! Before we close out September, however, we’d like to encourage you to view the presentations and submit comments on the Forsyth Park Draft Master Plan. If you enjoy biking or rolling in and around Forsyth Park, it’s important to have your voice heard. The deadline for comments is this Thursday, Sept. 30 — so let’s keep Forsyth for All! 

Great news on the construction front — Police Memorial Trail is open to the public again! Thank you to the City of Savannah for completing this crucial infrastructure link in the Truman Linear Park Trail and Tide To Town network. Click here to view the map and for more information. Stay tuned for a ribbon cutting date!

And on the other side of the county, we had the opportunity to visit the construction site at McQueen’s Island Trail. This trail has been closed for many years due to erosion and degraded trail surfaces from various hurricanes and tropical storms, and we’re excited that the crew has done a great job to repair the seawall and prevent further erosion of the property. Tides and weather permitting, the County hopes to complete construction by the end of November.

We have a ton of great events planned for October, including the return of the Cycle Social! This month we’ll meet on Wednesday, Oct. 20 at 6 p.m. at Lake Mayer to ride the Truman Linear Park Trail and discuss next steps for Tide to Town, our urban trail system. Want to host a Cycle Social in your neighborhood? Send us an email at info@bikewalksavannah.org. Check out all our events and volunteer opportunities on our website.

Happy biking, walking and rolling! Stay tuned for some exciting additional fall events and new plans for 2022.

Caila Brown
Executive Director, Bike Walk Savannah

Submit your photo for the 2022 BikeSAV Map Cover Contest!

2022 is fast approaching… which means it’s nearly time to print next year’s BikeSAV Map & Guide! Our guide provides a street suitability map of downtown, recommended longer-distance routes around the county, and tips for safe biking. It’s distributed free of charge to residents and visitors of Savannah in bike shops, tour spots, visitors centers and more.

Each year we look forward to working with Bike Walk Savannah members and supporters to find the perfect cover photo, showcasing our favorite spots in Savannah and some pretty cool bikes.

That’s where you come in! Submit up to 3 vertically oriented photos (or photos that can be vertically cropped, like seen in our maps above) to our 2022 BikeSAV Map & Guide Cover Contest, showcasing your bike and your favorite spot to ride within Savannah or Chatham County. If your photo includes people, please ensure that you have their permission to submit.

The top submissions (as identified by the BWS board and staff) will be posted on Facebook for voting in early October. The top submissions will receive a free BWS family membership, and the winner will receive a BWS family membership and BWS Swag Pack.

2022 BikeSAV Guide Cover Contest Submission Form

My initials above certify that I have granted Bike Walk Savannah permission to include my entry(entries), if selected, on the 2022 Bike SAV Map & Guide and on accompanying promotional materials. I retain all other copyrights for this entry. I have received and read a copy of the official rules and understand that failure to follow these rules may result in disqualification of my entry.

2022 BIKESAV GUIDE COVER CONTEST RULES

  1. Work published previously in any copyrighted newspaper, magazine, book or other medium is ineligible. Entries must be original and be the intellectual property of the submitter.
  2. Contestants may enter up to three (3) images.
  3. Submissions should follow these guidelines:
    1. Photo dimensions: at least 300 dpi, with image size of at least 4″ x 9″. If your image cannot print clearly, it may not be selected.
    2. Photo file should be named: FirstNameLastName-1. If submitting multiple entries, please label them -2 and -3.
  4. Submissions will also be accepted via email at info@bikewalksavannah.org. All form fields must be included in the email.
  5. Entries should be submitted via this form or by email no later than 5 p.m. on Thursday, Sept. 30, 2021. We will only accept entries in digital format.
  6. Bike Walk Savannah board members and staff will judge the top submissions, and Facebook audience/BWS members will decide the final winner. BWS reserves the rights to alter the final selection based on print quality and needs.
  7. All contestants agree to allow Bike Walk Savannah to use their entry in social media posts and in the final print and digital distribution of the BikeSAV Guide, if selected. Winners may be asked to provide a photo to appear with their entry on the Bike Walk Savannah website.
  8. The top submissions will receive a free BWS family membership, and the winning entry will receive a BWS family membership and BWS Swag Pack.